A nod to a classic childhood favorite, this chocolate cake roll combines light chocolate sponge cake with sweet vanilla whipped cream and dark chocolate ganache. Rich and totally irresistible, this beautifully spiraled dessert just might hypnotize you into reaching for another slice! You are getting very… hungry…
I originally published this recipe in 2019 and have made a few small updates to produce a moister, deeper flavored cake.
I love recreating nostalgic treats, like the packaged ones that were always a thrill to find in your lunchbox. Making childhood favorites from scratch—like brown sugar cinnamon pop tarts, mini animal cracker cookies, rice krispie treats, cream-filled chocolate cupcakes, and, of course, oatmeal creme pies!—is so rewarding, because not only do they bring back happy memories, but also the homemade versions invariably taste even better (and definitely fresher) than the store-bought packaged originals. This chocolate cake roll—aka Ho Ho, Swiss Roll, and Yodel—is another nostalgic favorite.
I first published this recipe in 2019, but recently revisited it and retested it to see if I could improve it. I always like to continue to work on recipes, including ones that have been published and may not have the best reviews.
In the case of this Swiss roll recipe, some reviewers reported that their chocolate sponge cake was dry, cracking or breaking when they tried to roll it, and didn’t have enough chocolate flavor. When I see a pattern of reviews with concerns over the same thing, I will revisit the recipe and try making various tweaks until I’m confident I’ve fixed the issues readers have been having.
The updated recipe is below, and similar to a cake roll recipe I worked on over the past year that will be in my forthcoming cookbook. Different flavors, but I met some of the same challenges while developing the recipe.
After making many (many!) more chocolate cake rolls, I’m proud to announce this chocolate cake roll is better than ever! You’ll notice a few ingredient tweaks in the updated recipe, including swapping out the melted butter for vegetable oil, and the addition of buttermilk, both of which add extra moisture to the sponge cake crumb.
This New & Improved Chocolate Cake Roll Has:
A light, fluffy, and moist texture
More pure cocoa flavor
A sweet vanilla whipped cream filling
A rich dark chocolate ganache topping
It’s also easier to roll up, and much less prone to cracking as you roll.
Key Ingredients for Chocolate Sponge Cake:
Cake Flour or All-Purpose Flour: You can use either. My team and I extensively tested the recipe and there is no difference either way.
Unsweetened Cocoa Powder: You can use either Dutch-process cocoa powder OR natural cocoa powder.
Separated Eggs: Eggs are the workhorse of this recipe, mostly providing structure and moisture. You need 4 separated eggs. You’ll whip the egg whites into medium peaks to introduce a hefty amount of air into the light batter.
Oil: As I tested this recipe, one of my main avoidances was a dry sponge cake. Oil makes for a moister chocolate cake than if you were to use butter (which is what the old recipe called for). It’s what we use in these super-moist chocolate cupcakes, too.
Buttermilk: Another key moisture provider that makes a big difference in the texture of this sponge cake. If you don’t have buttermilk, whole milk works instead.
Espresso Powder: Just a small amount heightens the cocoa flavor; it doesn’t taste like coffee at all.
Step-by-Step Photos
You need a few bowls, a sifter/sieve, and a handheld or stand mixer fitted with a whisk attachment.
Whip egg whites & some of the sugar into medium peaks: This takes at least 4–5 minutes, so don’t get discouraged if you think it’s taking too long, especially if it’s humid where you live. Keep beating!
Separately, beat egg yolks and remaining sugar, then add vanilla, oil, buttermilk, and espresso powder.
Then you’ll fold in the egg whites in 2 additions, making sure not to deflate the batter. At this point, the batter is light & foamy:
On left: egg yolks and other wet ingredients. On right: after folding in the egg whites.
Sift dry ingredients: One of the most important steps in this recipe is to sift the dry ingredients together. Pick up a large sieve. If you bake often, it will come in handy!
Then sift them into the egg white/yolk mixture. Fold the batter together gently to combine and then spread the batter into the 12×17-inch baking pan.
Bake for only around 13–14 minutes. This is a very thin cake.
Invert the warm cake: No time for cooling! Immediately invert the warm cake onto parchment paper or a clean thin kitchen towel dusted with cocoa powder.
Cool in rolled-up shape: Gently roll the cake up with the parchment/towel. Let it cool at room temperature in the rolled-up shape so when it’s time to roll it up with the whipped cream filling, it’s already “familiar” with the shape. (And won’t resist or crack as much!)
Assemble: Once cool, unroll the cake, add whipped cream, roll back up (without the parchment paper this time), then top with ganache.
Swiss Roll Cake Filling
The whipped cream filling inside the cake roll is billowy and soft with deliciously sweet vanilla flavor—a light and lovely contrast to the rich chocolate ganache we’ll spread on top. Because the ganache is pretty dark, I use a bit more sugar and vanilla extract compared with my usual whipped cream recipe. You can use either confectioners’ sugar or granulated sugar in the whipped cream—see my recipe Note. And this is optional, but I always add some store-bought marshmallow creme (“fluff”) to this whipped cream filling, which gives it the most remarkable flavor. Taste testers were raving over it!
Roll the cake back up (without parchment this time), then set it aside as you prepare the chocolate ganache.
Chocolate Ganache Topping
The only thing simpler than homemade whipped cream is homemade chocolate ganache. Simply combine warm cream with finely chopped chocolate, then stir the two together until completely smooth. I like to add a teaspoon of corn syrup for an extra glossy finish, but that’s totally optional.
I have 2 chocolate ganache success tips for you:
Use real chocolate such as Baker’s or Ghirardelli baking bars found in the baking aisle. I prefer the bars labeled Bittersweet (60% cacao). Avoid chocolate chips, which contain stabilizers to prevent them from melting completely.
Chop up the chocolate into super-fine pieces. The smaller the pieces, the quicker it melts and the smoother it tastes.
Chill the cake roll so the chocolate ganache sets, which makes slicing a bit neater. (Though there’s still plenty of lick-your-finger moments!)
Chocolate Cake Roll Success Tips
Prevent the cake from cracking: Cake rolls can crack when you roll them; this is completely normal. In fact, the pictured cake roll above cracked! Do not get discouraged, because you can piece it back together easily, then cover it with filling. What I find helps prevent cracking is rolling it up initially when it’s still warm, and rolling it up slowly. Also, let the cake roll cool at room temperature for that initial cooling (before unrolling and adding the filling). If it’s cold when you unroll it to spread the filling on, it usually cracks.
Make it thicker: I use and recommend a 12×17-inch half sheet pan. You can also use a 10×15-inch pan, like we use for pumpkin roll, but note that the bake time is 5 minutes longer and the cake is thicker. I prefer the thinner cake with this chocolate/fluffy whipped filling combo. I also find the thinner cake isn’t as prone to cracking.
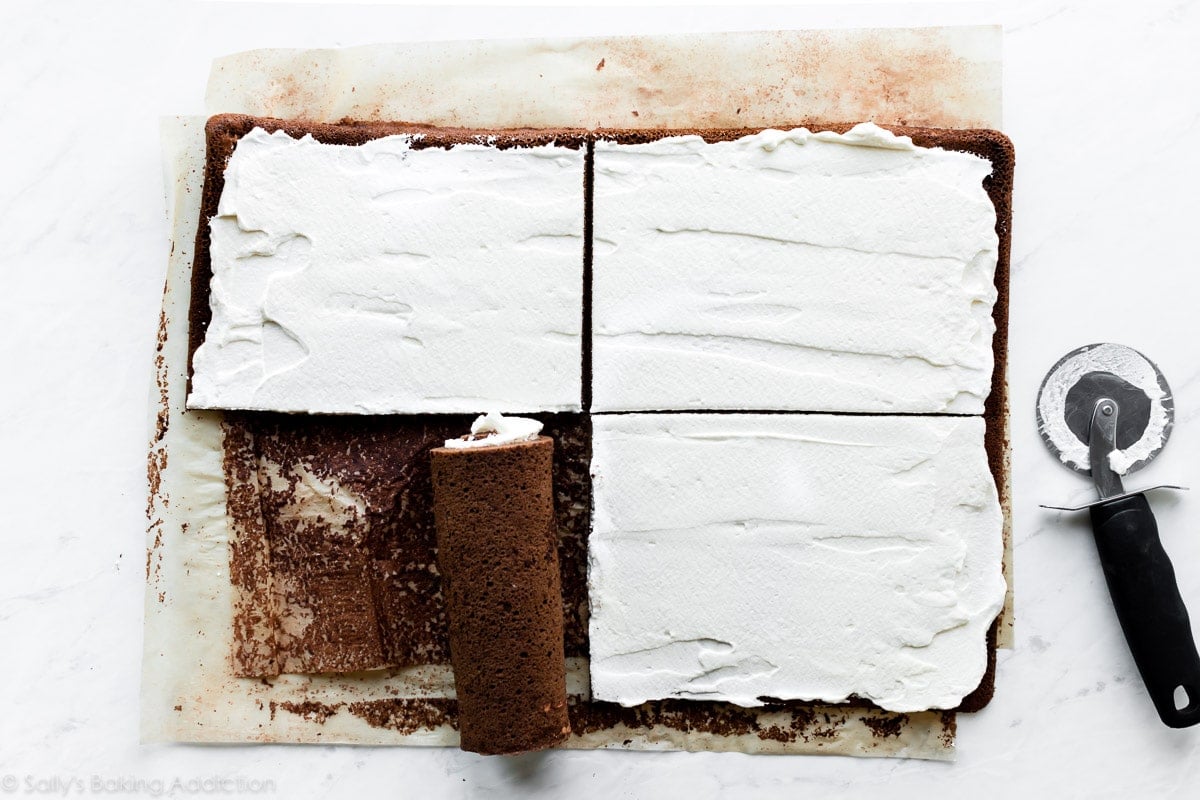
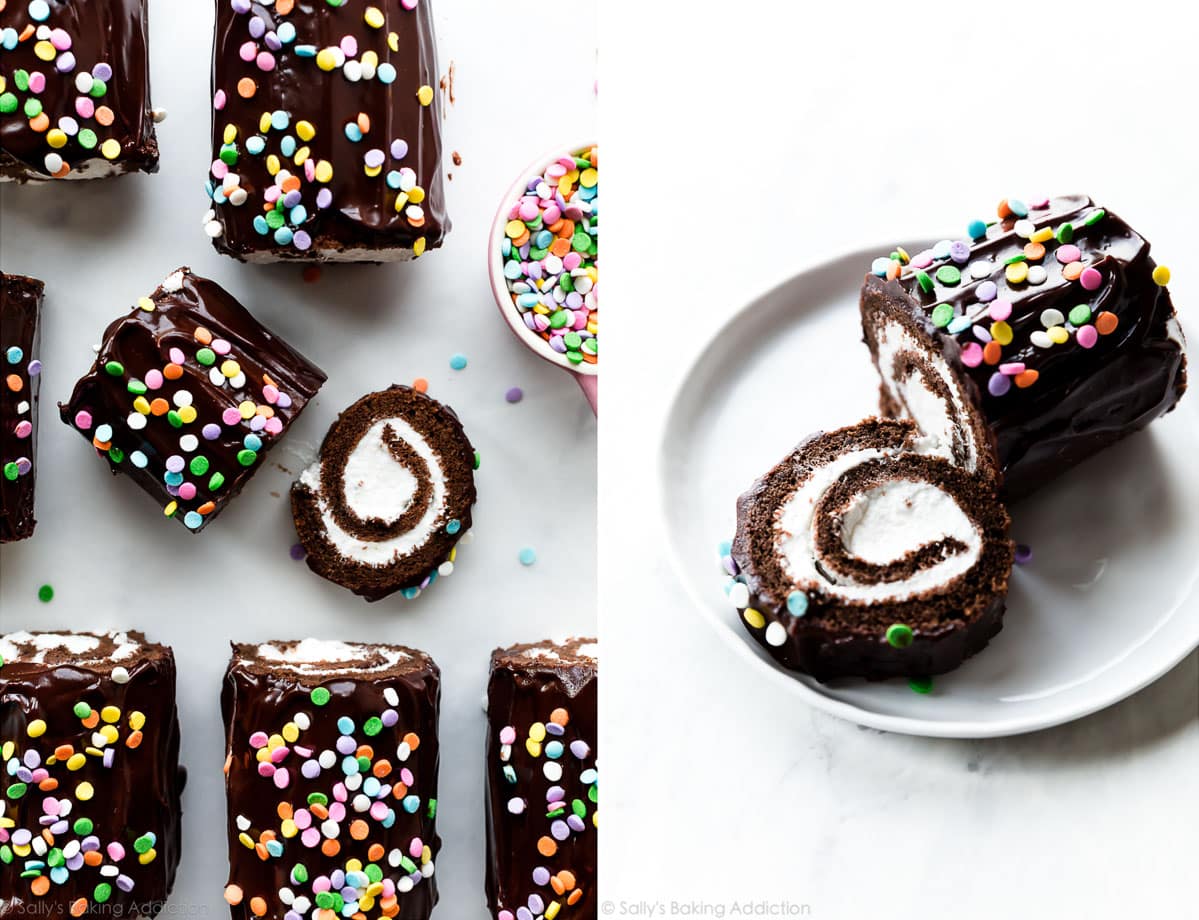
Make them mini size (pictured below): You can also make mini chocolate cake rolls, which are closer in size to the Hostess or Little Debbie snack cakes we love. If you’re making the mini size, cut the cake into 4 equal pieces. Roll each up, then slice in half to yield 8 mini cake rolls.
Print
Chocolate Swiss Roll Cake
5 Stars 4 Stars 3 Stars 2 Stars 1 Star 5 from 2 reviews
Author: Sally
Prep Time:1 hour
Cook Time:10 minutes
Total Time:3 hours, 40 minutes
Yield:10-12 slices
Category:Dessert
Method:Baking
Cuisine:American
Description
Rich and totally irresistible, this chocolate cake roll is for chocolate lovers everywhere. Follow this carefully explained step-by-step recipe for best success. Recipe was updated and improved in 2024. It’s moist and full of chocolate flavor!
Vanilla Whipped Cream
Chocolate Topping
Instructions
Preheat oven to 350°F (177°C). Grease a 12×17-inch baking pan with nonstick spray or butter, then line it with parchment paper so the cake seamlessly releases in step 7. Spray or grease the parchment paper, too. We want an extremely nonstick surface for this cake roll.
Make the cake: Using a fine mesh sieve, sift the cake flour, cocoa powder, baking powder, and salt together. Set aside.
Using a hand mixer or a stand mixer fitted with whisk attachment, beat the egg whites and 1/4 cup (50g) granulated sugar together on high speed for 4–5 minutes or until foamy-looking medium peaks form. (Medium peaks have a slight droop, and aren’t quite stiff.) Transfer to another bowl.
Using the same mixing bowl you just had the egg whites in (no need to clean it), add the egg yolks and remaining sugar. Mix on high speed for 1 minute, and then add the oil, milk, vanilla, and espresso powder. Beat together on high speed for 2 minutes. Mixture will be thin and a little bubbly on top. Add half of the whipped egg whites into the egg yolk mixture. Mix on low speed for 10 seconds. Repeat with remaining egg whites and mix on low for 10 seconds.
Sift in the flour mixture, and then fold the batter together with a silicone spatula until combined. Do not over-mix. Batter is light and fluffy.
Spread batter evenly into prepared pan. It will be a very thin layer. Shimmy the pan on the counter to smooth out the top. Bake for 12–14 minutes or until the top of the cake lightly springs back when touched with your finger. Do NOT over-bake.
Prepare to roll/roll the cake: As the cake bakes, place a piece of parchment paper (larger than the cake) or a thin kitchen/tea towel flat on the counter. (Note: I find a kitchen/tea towel is better to help prevent cracking.) Using a fine mesh sieve, dust parchment/towel with about 2 Tablespoons of cocoa powder. Once the cake comes out of the oven, quickly run a knife around the edges to loosen it from the pan. Immediately invert it onto the parchment/towel. Peel off the parchment paper that was on the bottom of the cake as it baked. Starting with the narrow end, begin tightly rolling the hot cake up with the parchment/towel. Do this slowly and gently. The cake will be warm. Allow the cake to cool completely at room temperature rolled up in the parchment/towel, about 3 hours. Feel free to set it aside for up to 1 day. (Note that letting it cool in the refrigerator and then unrolling it when it’s cold will cause it to tear and break. I strongly recommend letting it cool slowly at room temperature.)
Make the whipped cream: Using a hand mixer or a stand mixer fitted with a whisk attachment, whip the heavy cream, sugar, and vanilla extract on medium-high speed until medium to stiff peaks form, about 2–3 minutes. Then beat in the marshmallow creme, if using.
Slowly and gently unroll the cake. Spread whipped cream evenly on top, leaving about a 1/2-inch border around the cake. Gently roll the cake back up, without the parchment/towel this time. Place on a wire rack set on a baking sheet (to catch any drips of ganache). Set aside on the counter or in the refrigerator as you prepare the ganache.
Make the ganache topping: Place chopped chocolate and corn syrup, if using, in a medium bowl. Heat the cream in a small saucepan until it begins to gently simmer. (Do not let it come to a rapid boil—that’s too hot.) Pour over chocolate, then let sit for 2–3 minutes to gently soften the chocolate. Slowly stir until completely combined and chocolate is completely melted. Ganache is smooth and glossy.
Pour ganache all over cake roll. Feel free to spoon up any dripped ganache and spoon over the cake again. Refrigerate for at least 30–60 minutes before slicing and serving.
Cover leftover cake and store in the refrigerator for up to 3 days.
Notes
Make Ahead & Freezing Instructions: You can prepare the cake through step 7 and let the cake cool at room temperature for 1 day before continuing with step 8. Prepared cake roll, with filling, freezes well for up to 2–3 months. Thaw overnight in the refrigerator before topping with ganache and serving. For best taste and texture, I don’t recommend freezing with the ganache topping.
Special Tools (affiliate links): 12×17-inch Baking Sheet | Parchment Paper | Electric Mixer (Handheld or Stand) | Glass Mixing Bowls | Fine Mesh Sieve | Silicone Spatula or Wooden Spoon | Cooling Rack | Linen Kitchen Towels
Mini Chocolate Cake Rolls: Follow the recipe exactly as written. After spreading the whipped cream on top of the cake in step 9, cut the cake into 4 (approx. 6-inch x 8.5-inch) rectangles. Starting with the narrow end, roll each mini roll up. Slice in half to make 8 mini cake rolls. Continue with the recipe. Top with sprinkles if desired.
Pan Size: I use and recommend a 12×17-inch half sheet pan. You can also use a 10×15-inch pan, like we use for pumpkin roll, but note that the bake time is 5 minutes longer and the cake is thicker. I prefer the thinner cake with this chocolate/fluffy whipped filling combo. I also find the thinner cake isn’t as prone to cracking.
Flour: You can use either cake flour or all-purpose flour. My team and I extensively tested this recipe with both and there was no difference. Use 95g of either.
Espresso Powder: This deepens chocolate flavor in desserts. This cake roll does not taste like coffee at all. If desired, you can leave it out.
Sugar in Whipped Cream: Some bakers swear by granulated sugar in whipped cream; others swear by confectioners’ sugar. If you’re only working with a couple Tablespoons of sugar, it doesn’t really make a difference. Use either.
Optional Marshmallow Creme: For a little marshmallow flavor, beat marshmallow creme into the whipped cream. This is totally optional.
Updated in 2024: Based on reader feedback about the cake tasting dry, lacking flavor, and cracking, I made some updates and the updated recipe is what you see above. To make the original recipe, swap oil for the same amount of melted butter, reduce the cocoa powder in the cake to 3 Tbsp (15g), reduce the flour to 1/2 cup (63g), and skip the milk. Bake time is 10 minutes.