[ad_1]

As a Python developer, you’re probably eager to control and monitor your Raspberry Pi GPIOs remotely. Well, you have landed in the right place.
This article builds upon our previous introduction to “Visualize your Raspberry Pi data with Arduino Cloud | Part I.” Now, we’ll explore using Python to configure Raspberry Pi GPIOs, a fundamental step for many IoT projects that is usually considered as the “hello world” of IoT applications. Whether you’re controlling relays or monitoring digital inputs, managing GPIOs is crucial.
But IoT applications need to be accessed remotely with a dashboard that allows you to visualize your device data both in real time and its historical evolution, as well as acting remotely over your device.
Well, let’s deep dive into how we can achieve all that!
Physical setup
In this blog post, we show a very simple but comprehensive example. We will see how to use an Arduino Cloud dashboard to act remotely over your Raspberry Pi digital GPIOs. In a nutshell, we will see how to:
- switch on and off an LED that is connected to your Raspberry Pi
- detect when a push button that is connected to your Raspberry Pi is pressed
- visualize the real time and historical value of an integer variable
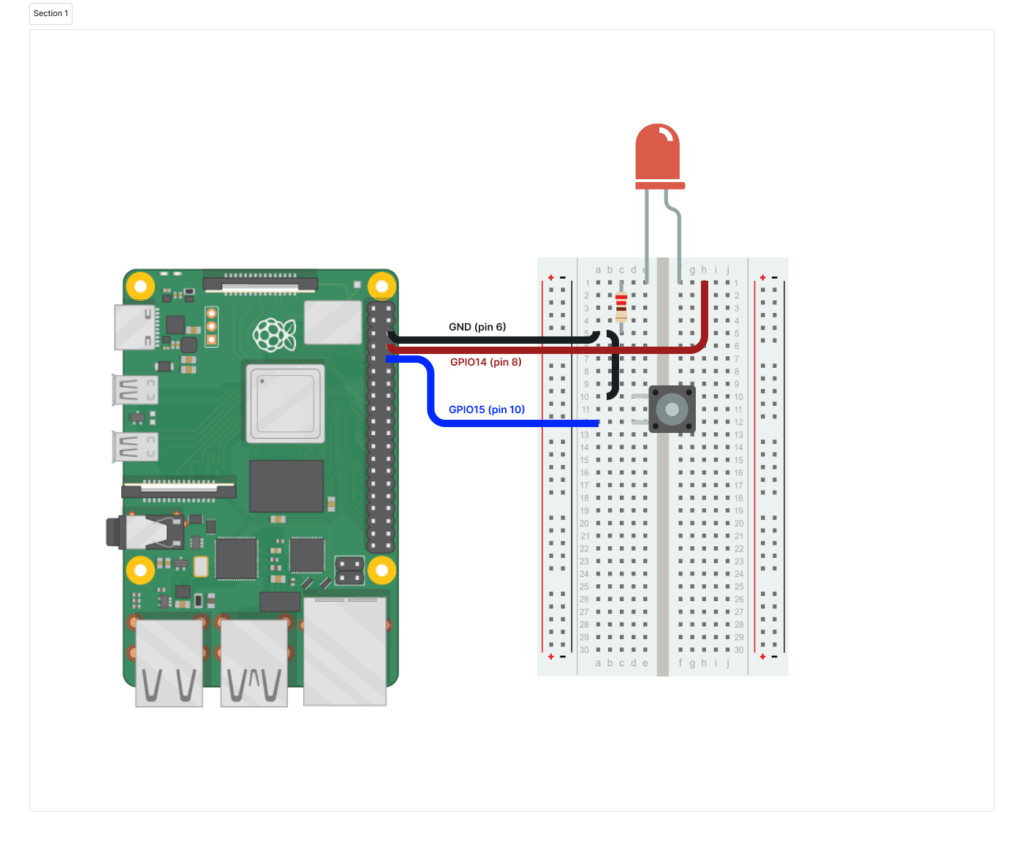
First, let’s connect our Raspberry Pi to an LED and a push button as shown in the following diagram.

It’s a very simple setup. Now that we have everything ready, let’s get started!
Create the Device and Thing in Arduino Cloud
To send your Raspberry Pi data to the Arduino Cloud, you have to follow these simple steps:
1. Set up an Arduino Cloud account if you didn’t have one before.
2. Create your Device as a Manual device.

Note: Note down your Device ID and Secret, as we will need them later.
3. Create your Thing and add your variables.

In the example shown in this blog post, we use the following three variables:
- test_value: We will use this integer variable to show an integer value generated periodically in our Raspberry Pi application in our Arduino Cloud dashboard.
- button: We will use this boolean variable to send the information to the Cloud when the push button is pressed.
- led: We will use this boolean variable to switch on and off the LED from the Arduino Cloud dashboard.
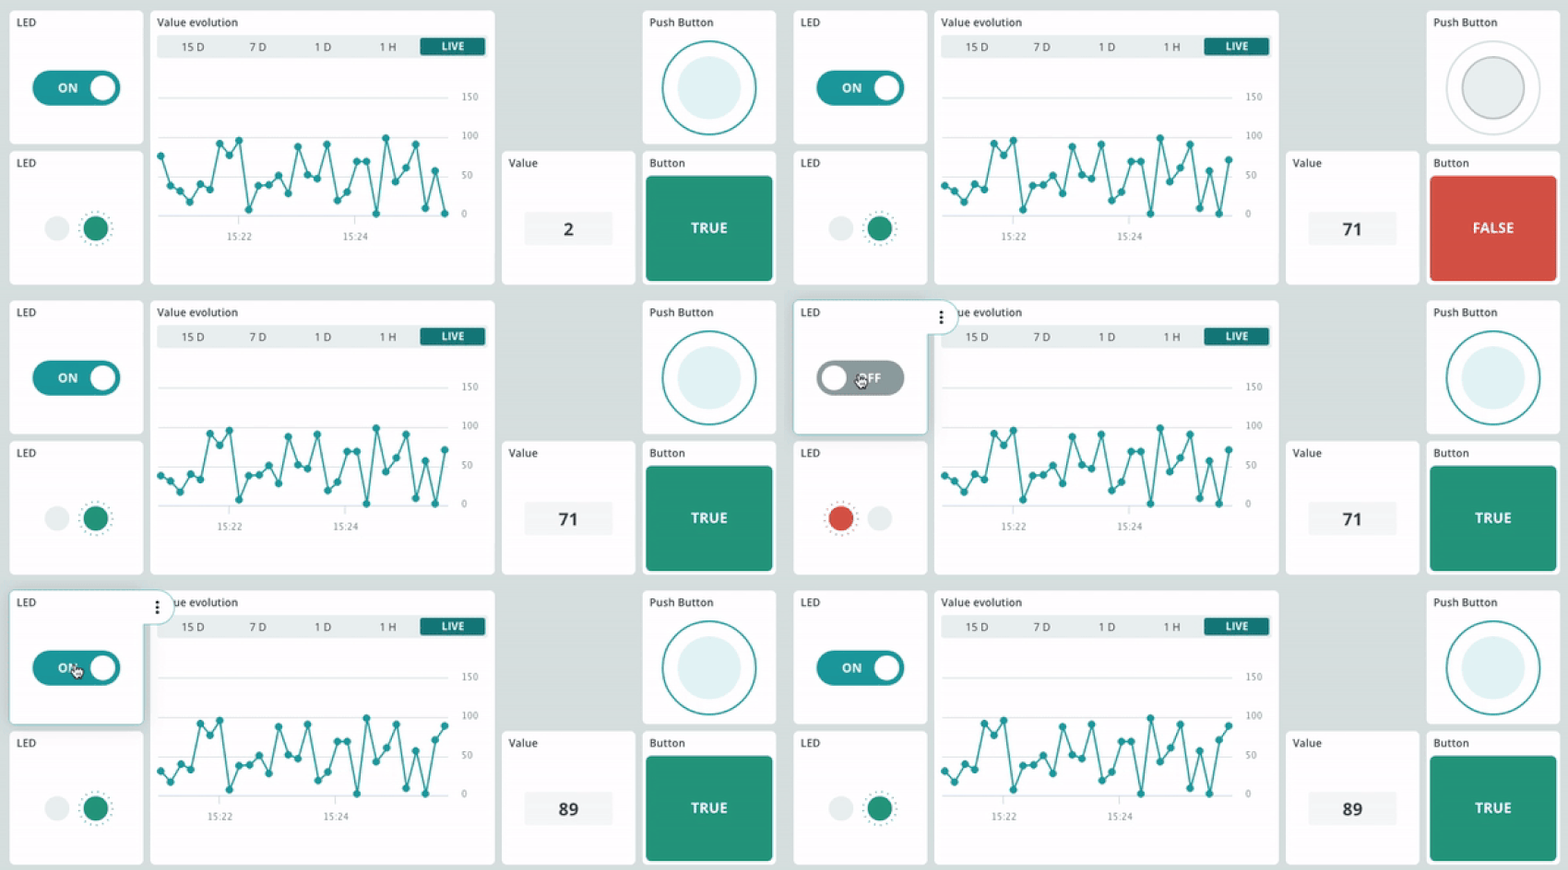
4. Create an Arduino Cloud dashboard for data visualization:
- Create a switch widget (name: LED) and a LED widget (name: LED) and linke them to the led variable
- Create a chart widget (name: Value evolution) and a Value widget (name: Value) and link them to the test_value variable.
- Create a Push button (name: Push Button) and a Status widget (name: Button) and link them to the button variable.

With the dashboard, you will be able to:
- Switch ON and OFF the LED using the switch widget.
- Visualize the status of the LED with the LED widget.
- Visualize the real time value of the variable test_value with the Value widget.
- Visualize the evolution over time of the variable test_value with the chart widget.
- Visualize on the Push Button and Button widgets when the push button has been pressed on the board.
Note: You can find more detailed info about the full process in our documentation guide.
Program your IoT device using Python
Now it’s time to develop your Python application.
#! /usr/bin/python3


import random
import gpiod
from gpiod.line import Direction, Value, Bias
from arduino_iot_cloud import ArduinoCloudClient
from credentials import DEVICE_ID, SECRET_KEY


LED=14      # GPIO14, Pin 8
BUTTON=15   # GPIO15, Pin 10


# For Raspberry PI 5, the chip is gpiochip4. Check for other RPI flavours.
chip = gpiod.Chip('/dev/gpiochip4')
req=chip.request_lines(consumer="rpi-acloud-gpio-basic",
     config= {
        LED    : gpiod.LineSettings(direction=Direction.OUTPUT),
        BUTTON : gpiod.LineSettings(direction=Direction.INPUT, bias=Bias.PULL_UP),
     })


# This function is executed every 1.0 seconds (as defined in the registration) and
# returns a random integer value between 0 and 100
def read_button(client):
  button = req.get_value(BUTTON)
  if button == Value.INACTIVE:
     return False
  else:
     return True


# This function is executed every 10.0 seconds (as defined in the registration) and
# returns a random integer value between 0 and 100
def read_value(client):
  return random.randint(0, 100)


# This function is executed each time the "led" variable changes
def on_led_changed(client, value):
  if value:
      req.set_value(LED, Value.ACTIVE)
  else:
      req.set_value(LED, Value.INACTIVE)
  print("LED change! Status is: ", value)


if __name__ == "__main__":
  # Create Arduino Cloud connection
  client = ArduinoCloudClient(device_id=DEVICE_ID, username=DEVICE_ID, password=SECRET_KEY)


  # Register the Arduino Cloud variables with the callback functions
  client.register("test_value", on_read=read_value, interval=10.0)
  client.register("button", on_read=read_button, interval=1.0)
  client.register("led", value=None, on_write=on_led_changed)
   # Start the client
  client.start()
Create a file called credentials.py with your Device ID and secret.
#DEVICE_ID = b"YOUR_DEVICE_ID"
#SECRET_KEY = b"YOUR_SECRET_KEY"
This code can be used across all the various Raspberry Pi flavors and it should work also in any Linux-based machine. Just beware that you need to use the right gpiochip and set the right GPIO lines in the following code section:
LED=14      # GPIO14, Pin 8
BUTTON=15   # GPIO15, Pin 10

# For Raspberry PI 5, the chip is gpiochip4. Check for other RPI flavours.
chip = gpiod.Chip('/dev/gpiochip4')
You can get more information about the project in Project Hub and all the code and more details in the GitHub repository. Additionally, you can find a full python guide in the following article
Tutorial: Connect your Raspberry Pi to Arduino Cloud
Start with Arduino Cloud for free
Connecting your Raspberry Pi to the Arduino Cloud couldn’t be easier. All you need to do is create your free account and you are ready to go. It’s ready to use and it is free. You can explore the premium features for enhanced functionality.
So, if you’re looking to streamline data visualization of your Raspberry Pi applications using Python, give the Arduino Cloud a try and leverage its full potential for your projects.
Stay tuned for Part III and IV of our Raspberry Pi GPIO basic control blog post series in the Arduino Cloud.
[ad_2]